Set up Generic Emulation


|
Set up Generic Emulation |
|
|
Any emulator that supports rom files, disk images or cd images via command line parameters applies to this category.
Metropolis Launcher needs you to define startup parameters, supported platforms and other settings to make the emulators work correctly. However, many emulators are already known to Metropolis Launcher and their specific settings will automatically be applied when adding the emulator. This auto-configuration can also be run by pressing the Autoconfig this Emulator button in the Emulator Settings dialog.
Let's walk through the setup process with one of the following examples:
Example 1 - Set up a single or multi-platform emulator
In this example we will be setting up Gens+ REWiND! (you can download it from http://www.emulation-evolved.net *hint*hint*) for the following platforms: - SEGA - Master System - SEGA - Game Gear - SEGA - Genesis / Mega Drive - SEGA - 32X - SEGA - SEGA CD
Anyways, you can follow the steps as well for emulators like - Snes9x - Project64 - Kega Fusion etc.
In this example we will have it installed in "D:\Games\_Emulation\GensPlusRewind"
1. Open Emulator Settings: - via the Emulator Settings button on the Settings page or - via the menu item Open Emulator Settings in the context menu (right click) in Games & Emulation Main Screen.
2. Press the Add button or use the context menu (right click) -> Add
3. A dialog shows up where you browse to the emulator's .exe file For this example choose "D:\Games\_Emulation\GensPlusRewind\gensrw.exe"
4. The emulator is shown in the list, select it, if it is not already selected
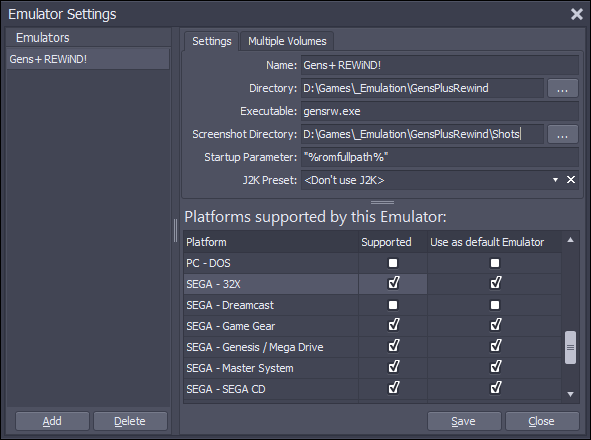
5. (Optional) alter the name The name can be freely chosen by you and will be displayed in context menus and the Emulator Settings list. For this example we change it to "Gens+ REWiND!"
6. (Optional) select the screenshot directory Metropolis Launcher monitors screenshot directories in order to file screenshots taken in a session to the correct game entry. Gens+ REWiND! stores screenshots in the "Shots" directory, so we choose "D:\Games\_Emulation\GensPlusRewind\Shots" by pressing the
7. The startup parameter "%romfullpath%" is just fine With "%romfullpath%" the emulator will be launched and the full path of the game's rom file will be provided as the first command line parameter embedded in double quotes in order to keep the path together even if spaces are used in the path name. Click here to learn more about startup parameters.
8. Choose the supported platforms, (optional) choose those platforms where the emulator is the default emulator The table in the lower right corner lists all platforms supported by Metropolis Launcher. Tick every platform in the Supported column that is supported by the current emulator. The following platforms should be ticked in our example: - SEGA - 32X - SEGA - Game Gear - SEGA - Genesis / Megadrive - SEGA - SEGA CD
(Optional) Now tick all the platforms for which the current emulator should be the default emulator in column "Use as default emulator". The default emulator will later be the one that is launched with a double click or by pressing enter in the games list. For our example we tick all the platforms mentioned in 8. too.
9. Press the Save button
If you followed the steps of the example, the Emulator Settings should look like this:
After setting up your emulator, it is time to add some games.
Example 2 - Set up a multi-volume Emulator
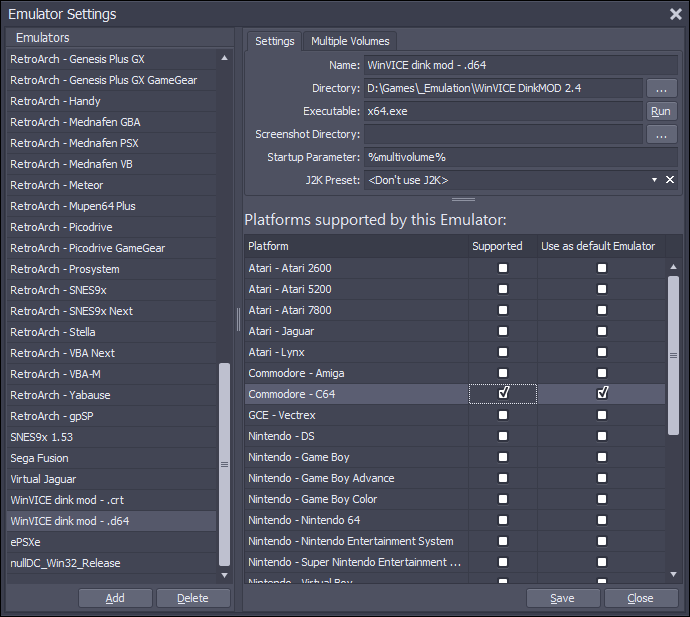
In this example we'll add the Commodore - C64 emulator WinVICE to Metropolis Launcher. The emulator accepts diskette images and is able to mount them in up to 4 virtual disk drives.
You can download WinVICE via http://vice-emu.sourceforge.net/#download or have a go with Dink's Mod (download http://cloud.cbm8bit.com/dink/vice-2.4.8.dinkmods.speedysl.v.95.zip, forum thread www.lemon64.com/forum/viewtopic.php?t=42474).
Follow example 1 steps 1. to 6. in order to add the emulator the list, then:
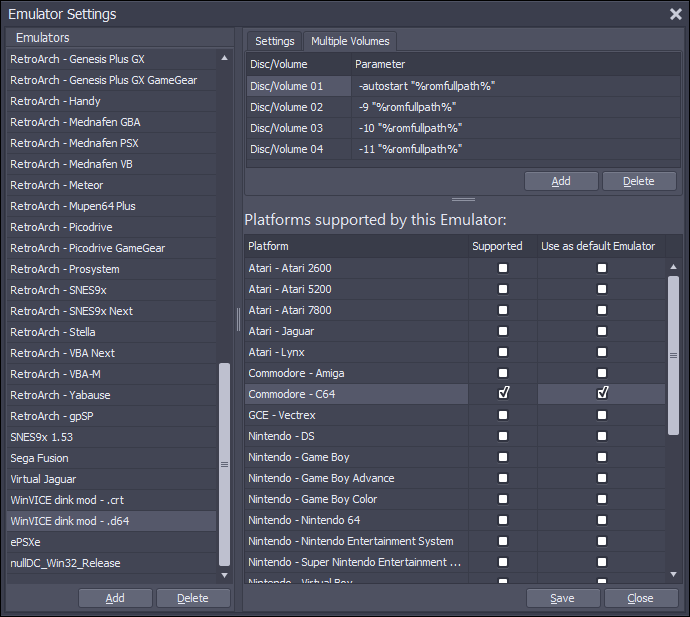
Important: each parameter starts with a space character! Click here to learn more about multi-volume startup parameters.
The table in the lower right corner lists all platforms supported by Metropolis Launcher. Tick every platform in the Supported column that is supported by the current emulator. The following platforms should be ticked in our example: - Commodore - C64
(Optional) Now tick all the platforms for which the current emulator should be the default emulator in column "Use as default emulator". The default emulator will later be the one that is launched with a double click or by pressing enter in the games list. For our example we tick Commodore - C64 too.
11. Press the Save button
If you followed the steps of the example, the Emulator Settings should look like this:
As the Commodore - C64 and thus WinVICE also support cartridge-based games, we can add WinVICE again as a single-volume emulator (analog to example 1) with the startup parameter:
-cartcrt "%romfullpath%"
RetroArch allows us to define a global configuration as well as numerous additional configurations. We will make use of this and create a global configuration and an additional configuration for each core (emulator). We will also use custom shaders for visual attractiveness and add these to the core-based configuration.
Visit http://buildbot.libretro.com/stable/ and choose a version from the list, choose the windows platform either 32bit (win-x86) or 64bit and download the Retroarch_?.?.?.?.7z (?s are the version number)
Visit http://buildbot.libretro.com/nightly/windows/,choose the 32bit (x86) or 64bit (x86_64) architecture and download Retroarch.7z (it should be of a current date and around 70MB in size)
You can also check the info\ subdirectory for informations about each core and download cores via http://buildbot.libretro.com (place them in the cores\ subdirectory)
Fast forward hold and Rewind are great features supported by RetroArch and should be mapped globally to a button or trigger Go to Settings -> Input Hotkey Binds Set up buttons or triggers for Rewind and Fast forward hold Go to Settings -> Rewind -> Enable and switch it to on
RetroAchievements allow you to earn achievements in emulated games, check www.retroachievements.org for further information and create an account there if you like.
As of this writing the RetroAchievements implementation is available in the nightly builds beginning in version 1.3 of RetroArch. The stable release 1.2.2 does not contain this.
In RetroArch go to Settings -> Retro Achievements and switch Enable to on.
Go to Settings -> User -> Account -> Retro Achievements and set up Username and Password.
This writes our global configuration file retroarch.cfg.
You can put core-specific configurations in there later (see 7. in this example).
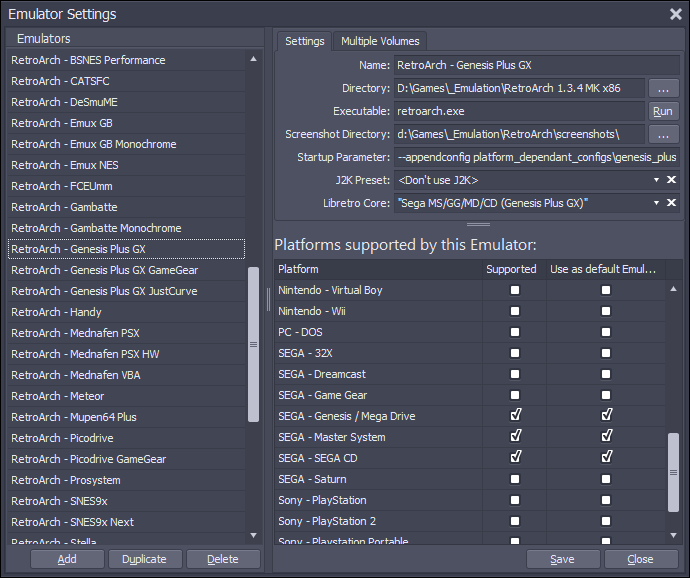
--appendconfig platform_dependant_configs\genesis_plus_gx.cfg "%romfullpath%"
this will run RetroArch with the appended configuration for the emulation core and the game's rom file location
Choose the core to be used from the dropdown. When you launch a game with RetroArch, this core will be added to the startup parameters as "-L cores\corename.dll"
The result should look like this (note that there are "Genesis Plus GX" and "Genesis Plus GX GameGear" - we'll cover this in the next section of the example):
Shaders provide visual effects on the emulation output and thus are able to simulate CRT TV, LCD or Dot Matrix (Gameboy Monochrome) output and much much more. In this part of the example, we'll use a CRT shader for stationary systems that were typically hooked up to a TV, an LCD shader for handheld systems and a Dot Matrix shader for the Nintendo Gameboy (Monochrome). All the mentioned shaders are already shipped with RetroArch (we downloaded them see 3.1. of this example), however, we want to ramp them up a bit:
Shaders are able to react to numerous events. One of these events is the Rewind hold. We will use custom shader definitions so that they will put a sepia colored layer over the image when a Rewind is taking place.
The shader types we'll use are CG-shaders. They are defined by a shader profile (.cgp file) and 1 or more shader passes (.cg files) and optional resource files (e.g. bitmap images).
We collect our shader modifications in the shaders\mk2k subdirectory within the RetroArch installation (create the mk2k subdirectory if it doesn't exist, the shader subdirectory should already be present).
Download http://www.mk2k.net/releases/pc/emu/retroarch_shaders_rewind-mk2k.zip and unpack in shaders\mk2k of your RetroArch installation.
The CRT Shader is based on the crt-interlaced-halation shader by cgwg, Themaister and DOLLS, simulates a CRT TV and reacts to Rewind. For each core-specific configuration that emulates a stationary system, put the following lines:
# Shader config video_shader_enable = "true" video_shader = "shaders\mk2k\crt-interlaced-halation_mk2k.cgp"
Some cores support more than one system and these systems may differ, for example Genesis Plus GX supports systems that were hooked to a TV (SEGA Genesis, Master System) as well as handheld systems (Game Gear). We'll let genesis_plus_gx.cfg handle the stationary systems and create genesis_plus_gx_gamegear.cfg for the handheld system with the proper shader setting (see next section in the example).
The LCD Shader is based on lcd-shader by Harlequin, simulates handheld system's LCD output and reacts to Rewind. For each core configuration that emulates a handheld system, add the following lines:
# Shader config video_shader_enable = "true" video_shader = "shaders\mk2k\lcd-shader_mk2k.cgp"
The Dot Matrix Shader simulates the output of Nintendo's monochrome Game Boy, is based on gb-shader by Harlequin and reacts to Rewind. For each core configuration that emulates the Game Boy monochrome, add the following lines:
# Shader config video_shader_enable = "true" video_shader = "shaders\mk2k\gb-shader_mk2k.cgp" |